Sync-N-Link X takes away the time-consuming chore of synchronizing dailies or rushes by batch processing an Event of clips with matching SMPTE/EBU Timecode.
Preparing Clips for Syncing
- Import the video files and audio files into a new Event in Final Cut Pro. Video and audio files must have jam-synced Timecode.
- If you have multiple days of clips in your Event, confirm the Content Created dates for the clips by choosing View > Event Browser > Group Clips By > Content Created. Sync-N-Link X can use the Content Created date to find the clips recorded on the same day. The content created date of clips can be changed by selecting a batch of clips and choosing Modify > Adjust Content Created Date and Time…
- Optionally Apply Custom Name to rename the clips.
- Optionally apply video adjustments, such as spacial conform and LUTs.
- Optionally change the audio configuration or disable unwanted audio channels in the audio clips. This can be done as a batch by selecting all the audio clips in the Event and making changes in the Inspector.
- Optionally add Camera Angle names. Multicams are created with video angles ordered by Camera Angle or Name, followed by audio angle(s).
- Optionally add keywords, favorites, rejected or markers. Any keywords/ratings/markers on the video and audio clips will pass through to the synchronized clips and multicams made by Sync-N-Link X.
Syncing Event(s) of Clips
- Select one or more Events. Choose the File menu and select Export XML…
IMPORTANT: Media must be fully imported before exporting XML. You can view the import progress in the Background Tasks window. - If you have a single day of clips choose the Extended Metadata View from the popup menu; otherwise choose the Sync-N-Link X Metadata View from the popup menu (see About transferring metadata from clips to Synchronized clips for more information about installing the Metadata View). Name and save the Event XML file. All clips should be online before exporting XML.
- In Sync-N-Link X, click the Open XML… button and select the exported Event XML file.
Tip: Final Cut Pro 10.3 or later supports drag-and-drop instead of exporting XML. An alternative to these first 3 steps is to choose the Sync-N-Link X Metadata View from the popup menu in the Inspector, then drag the Event and drop it on the Sync-N-Link X window. To make this easier, turn on the Float on Top checkbox so that the Sync-N-Link X window floats on top of Final Cut Pro. - Choose the options you want for your synchronized and/or multicam clips:
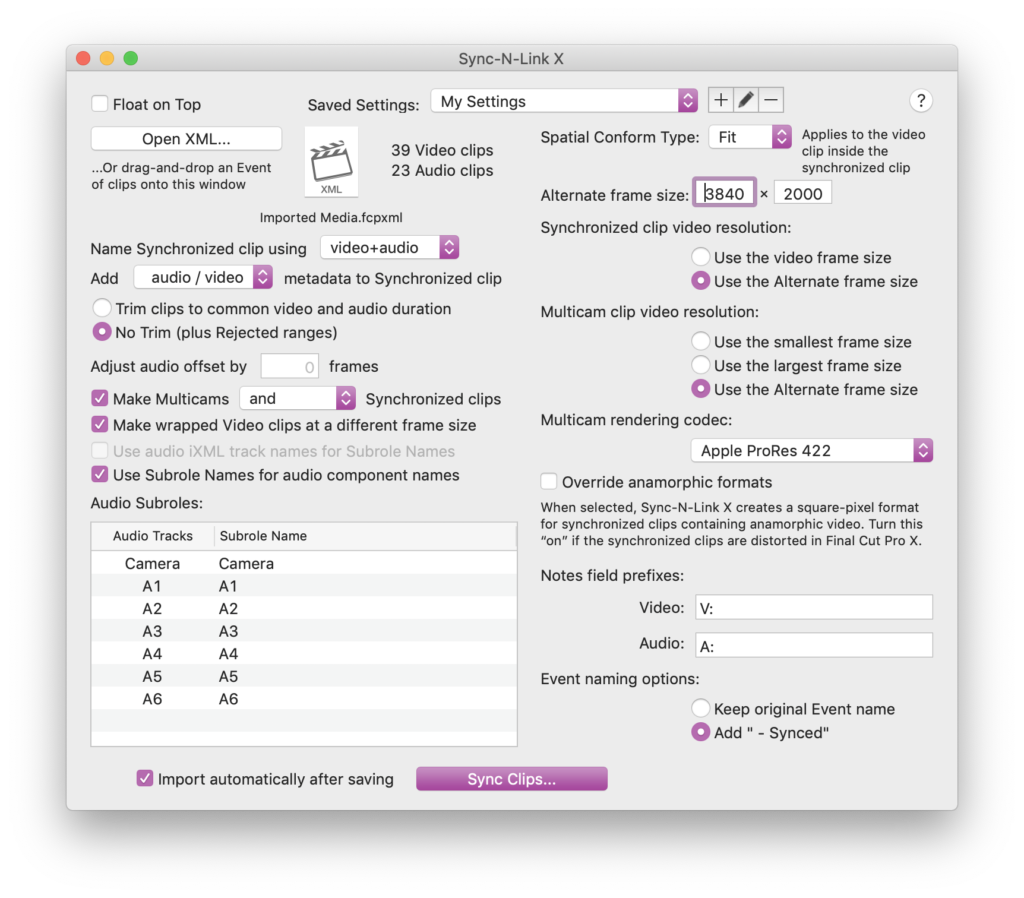
- Set the popup menu to choose whether to have the synchronized clips named after the video or audio clip names or both.
- Set the popup menu to choose whether to have notes and metadata from either the video or audio clip or both added to the synchronized clip. Only one piece of metadata is added to the synchronized clip: video/audio means that the video’s metadata will be used over the audio’s metadata, and audio/video means that the audio’s metadata will be used instead of the video’s metadata. (Both sets of Reel names are added.)
- You can also choose how the synced clips are trimmed. Trim clips to common video and audio duration will create a synchronized clips hard-trimmed to the area where there is both video and audio; No Trim (plus rejected ranges) will not trim the clips but will add Rejected ranges to the areas with video only or audio only.
IMPORTANT: Final Cut Pro does not support trimmed multicam clips in an event, but it does support multicam clips with rejected ranges.
WARNING: With hard-trimmed clips, you cannot access media outside the trimmed clip range, even if media exists in the original footage. - In cases where the video and audio are out of sync by a few frames, you can apply an adjustment to the audio offset. Enter the offset value into the Adjust audio offset entry box.
- Optionally choose to Make Multicams: choose and to make synchronized clips as well as multicams where there is one video angle; choose or to make multicams where there are multiple video angles but only synchronized clips when there is a single video angle; choose instead of to make no synchronized clips but instead make multicams when there are single or multiple video angles.
- Optionally choose to Use audio iXML track names for Subrole Names (if iXML is available in the WAV clips) or edit the subrole names for each audio track. For example tracks A7 and A8 may be renamed “Mixdown” so that in Final Cut Pro they will have the role Dialogue and the subrole Mixdown. (See About using iXML information from WAV files and Controlling Audio Playback with Roles.)
- Optionally choose to Use Subrole Names for audio component names to have the audio components named after the track’s subrole.
- Set the popup menu to choose the Spatial Conform Type. Spatial Conform is applied to the video clips inside a synchronized clip container and in a multicam angle. For example, to create synchronized or multicam clips with a custom resolution, set the Alternate frame size. In Sync-N-Link X, change the preferences to Spatial Conform Type None and video resolutions to Use the Alternate frame size.
- For multicam clips, the video resolution can either Use the smallest frame size of the multicam’s videos, Use the largest frame size, or Use the Alternate frame size set in the interface. You can also set a Multicam render codec using the popup menu.
- Each version of Final Cut Pro supports some anamorphic formats for synchronized clips, but newer anamorphic formats might create letterboxed or squeezed images in synced clips. As a work-around, Sync-N-Link X can create a square-pixel format for the synced clips that’s appropriate for the anamorphic format. (Un-synced clips retain the original anamorphic format.) To enable this feature, turn the Override anamorphic formats checkbox “on”.
- By default Sync-N-Link X will add “V:” at the start of notes from video clips and “A:” at the start of notes from audio clips. You can override this by entering your own notes prefixes in the Video: and Audio: fields, or leave the fields blank to have no prefixes added to the notes.
- By default Sync-N-Link X will add “ – Synced” to the event names in the XML file, which will create new events in your Library. For 10.3 and later, if you choose to Keep original Event name, Final Cut Pro will add the new synced clips and multicams into the original events their video clips came from.
- You can save a collection of interface settings for reuse in the future (see Saving Settings).
- Click the Sync Clips… button to start the process of finding matching audio. Sync-N-Link X will tell you to how many clips it found matching audio for, how many it didn’t, how many multicams were made, and gives you the option to save a report of the details (see About the Sync-N-Link X Report).
- In the Save dialog, name your XML file and choose a place to save it.
- In Final Cut Pro, choose the File menu and from the Import submenu, select XML… Select the XML file saved out of Sync-N-Link X. (Or use the Import automatically after saving checkbox to import the file for you.)
Final Cut Pro 10.3+ can update the Event: you’ll get a dialog saying “Application Sync-N-Link X sent an XML document that is about to replace existing items with matching names”. Click the Replace button to update the original Event with synchronized clips and multicam clips.
Audio subroles and component names are added to all clips. Multicam clips will be tagged with the keyword “Multicam”; synced clips will be tagged with the keyword “Synced” covering the range where there is both video and audio, and audio components in the synchronized clips are tagged with subroles. Camera audio is disabled in the inspector. The markers, keywords, ratings and metadata from the original clips are added to the synced clips, and notes in the video and audio clips’ Notes fields are joined and added to the synced clip’s or multicam’s Notes field.
Clips that were not used for synced clips are tagged with the keyword “Not Synced”.
Saving Settings
You can create a collection of settings that restore the options you’ve selected for making synchronized and/or multicam clips.
Click the “plus” button to name the setting and add it to the popup menu. If you make any changes to the interface options, these will be part of your selected setting. Click the “pencil” button to rename the Setting; click the “minus” button to remove the selected setting.
About using iXML information from WAV files
If the WAV files have iXML track names Sync-N-Link X will enable the checkbox Use audio iXML track names for Subrole Names. If this is on then the audio components will be tagged with subroles according to the iXML track/microphone names in the WAV file. Each WAV has its own iXML, so if during a shoot the audio had to change channel assignments for a person or character, as long as the new channel assignments are given the updated microphone names, then the subroles will be applied correctly to the channels for that clip.
You can still set the camera audio’s subrole name, but the other tracks will be disabled if you’re choosing to use the iXML track names.
The role names for the audio components (except for the camera audio) are dimmed because they are being defined from the iXML on a clip-by-clip basis. If you don’t want to use the iXML track/microphone names, you can turn off the Use audio iXML track names for Subrole Names checkbox to re-enable the subroles naming table. The disadvantage is that these names will be applied globally regardless of any changes to track assignment, whereas iXML track names can change between clips.
Circled and Wild Track metadata from iXML, if available, are added as keywords to the synced clips.
Multicam workflows
The multicam clips created by Sync-N-Link X from an Event of clips will have one or more angles of video clips and one or more angles of audio clips, synced to timecode.
Alternatively it’s possible to make multicams with synchronized clips on each angle by sending Sync-N-Link X an Event of previously synced clips. The workflow is:
- Export XML of the Event containing video and audio clips.
- Process the XML through Sync-N-Link X and back into Final Cut Pro with the Make Multicams checkbox ‘off’ so only synced clips are created.
- Optionally review and adjust the sync points of the synchronized clips in Final Cut Pro.
- Export XML of the new Event containing synchronized clips.
- Process the XML through Sync-N-Link X and back into Final Cut Pro with the Make Multicams checkbox ‘on’ so that multicams are created with a synchronized clip on each angle, synced to timecode.
The angles in a multicam clip are named using metadata in the XML from the original clips or synchronized clips. If Camera Angle metadata is available in the XML, that will be used for multicam angle names; if not, Camera Name metadata will be used; if neither of those are in the XML the multicam angles are given the clip names. For more information about getting Camera Angle or Camera Name metadata into the exported XML, see About transferring metadata from clips to Synchronized and Multicam clips.
About transferring metadata from clips to Synchronized and Multicam clips
Metadata in the original clips, such as Content Created, Reel, Scene, Take, Camera Angle, Camera Name and Camera LUT, can be included in the exported XML and transferred to the synchronized clips and multicams created by Sync-N-Link X. The easiest way to include this metadata is to install the Sync-N-Link X Metadata View and select it in the Metadata Views popup menu when exporting XML.
- In Sync-N-Link X, choose the Help menu and select Install Metadata View.
- Quit Final Cut Pro (if it is running) and run Final Cut Pro.
The Sync-N-Link X metadata view is available in the Info panel of the Inspector, and in the Metadata View popup menu of the Export XML dialog.
About the Sync-N-Link X Report
Sync-N-Link X can create a detailed report about the clips it was able to sync and those that weren’t synced. You can save this report as a text file by clicking the Save Report button. Sync-N-Link X will save the report text file and then prompt you to save the XML file.
The top of the report summarizes how many video clips had matching audio found for them, and how many video clips did not have matching audio.
Underneath the summary are listed the details of the video clips that were synced with audio. Example:
"A013_C002_0803FG_H" was synced with "Z004002.WAV"
Lastly is a list of video clips that were not synced to audio. If there was no audio captured during a take, Sync-N-Link X will report that it was unable to find audio for the video clip. Example:
Could not find audio for "A004_C001_0803DV_H"
Controlling Audio Playback with Roles
If the tracks in the WAV file have been labelled on set, Sync-N-Link X will give you the option of using those labels for the Dialog subroles, along with the subrole name you entered for the Camera track. If not, you can assign names for the audio and camera audio tracks in the Subrole table.
During editorial use Roles to control the audio tracks you want to work with:
- Choose the View menu and from the Timeline Index submenu select Roles.
- Deselect the checkboxes next to the subroles you don’t want to hear.